by Danish Ali Detho | O365 & Power Platform Solution Architect
DevOps plays a vital role in the success of any software development project but when it comes to building low-code/no-code solutions it is often neglected or skipped due to the lack of availability of tools to implement DevOps for such solutions. Now, we all know that developing solutions on the Power Platform is fast-paced but when it comes to deploying the solution, then it can be a hectic process especially when we have multiple environments. This is where DevOps comes in and once implemented properly then it will not only speed up the deployment process but will also streamline the process for any future development as well. In this blog, we will talk about the role of DevOps in the Power platform, the options which are available, and finally, we will go through the steps to implement DevOps in the Power platform using GitHub actions.
DevOps in Power Platform
Building solutions in the Power platform is often done rapidly but deployment can be a hassle if it’s done manually. When a process such as a deployment is difficult or risky, people naturally avoid the process by doing it infrequently or bypassing it entirely. Ending up with inconsistent environments.
DevOps in the Power platform helps in automating build and deployment tasks which helps in defining a process to make sure the deployments can be controlled by the operations and all the environments i.e. Development, Test, and Production always remain consistent.

Power Platform ALM vs Power platform ALM with DevOps
| Power Platform ALM |
Power platform ALM with DevOps |
 |
 |
Options to implement DevOps in Power Platform
Power Platform Build Tools for Azure DevOps
Azure DevOps is a (SaaS) platform from Microsoft that provides an end-to-end DevOps toolchain for developing and deploying software. It also integrates with most leading tools on the market and is a great option for orchestrating a DevOps toolchain. Microsoft Power Platform Build Tools can be installed into your Azure DevOps organization from Azure Marketplace. The azure Service principal is used for authenticating and connecting to your Power Platform Environment. The build tools are available at no cost. However, a valid subscription to Azure DevOps is required to utilize the Build Tools.
Github Actions
GitHub Actions is a CI/CD tool for the GitHub flow. You can use it to integrate and deploy to third-party cloud application platforms as well as test, track, and manage code changes. Using Through GitHub actions, we Create workflows in the source control repository to build, test, package, release, and deploy apps; perform automation, and manage bots and other components built on Microsoft Power Platform. 2,000 action minutes/month are available for free (Personal) and 50,000 action minutes/month are available for free (Enterprise).
Power Platform DevOps End to End Process using GitHub Actions

Setup Power Platform DevOps using GitHub Actions
Lets start off by creating two environments one act as Development in which you will create or import a solution and the other act as your test/Production environment where you want to deploy the solution. Make sure both environments has Dataverse.

In the Dev Environment, create or import a solution that you will use for the deployment.

Create a new application in Azure -> Enterprise Registrations and add the API permissions to access the power platform environment.

Create a Secret and then copy the value of the secret, Application ID, and Tenant ID

Add the Azure Service Principal in both environments as App User and grant it the System Administrator role.

That’s all we need to do in the Power Platform, now switch to GitHub and create a Repo (If you don’t have one already).
In GitHub go to Repo Settings-> Actions-> Secrets and create a new secret and in the value add the client secret value from the Azure Service Principal.

Now, we need to create three flows to export the solution from Dev environment, import it to Test/Prod environment and create a release.
Export and branch Solution from Dev
Go to Actions-> New Workflow -> Setup workflow yourself. name it “export-and-branch-solution.yml” and then copy the yml from here. Make sure to change the value to your environment where it states “#edit your values here”.
Import Solution to Test/Prod with Inputs
Follow the same process to create the next workflow and name it “release-solution-to-prod-with-inputs.yml” and then copy the yml from here.
Call to Release
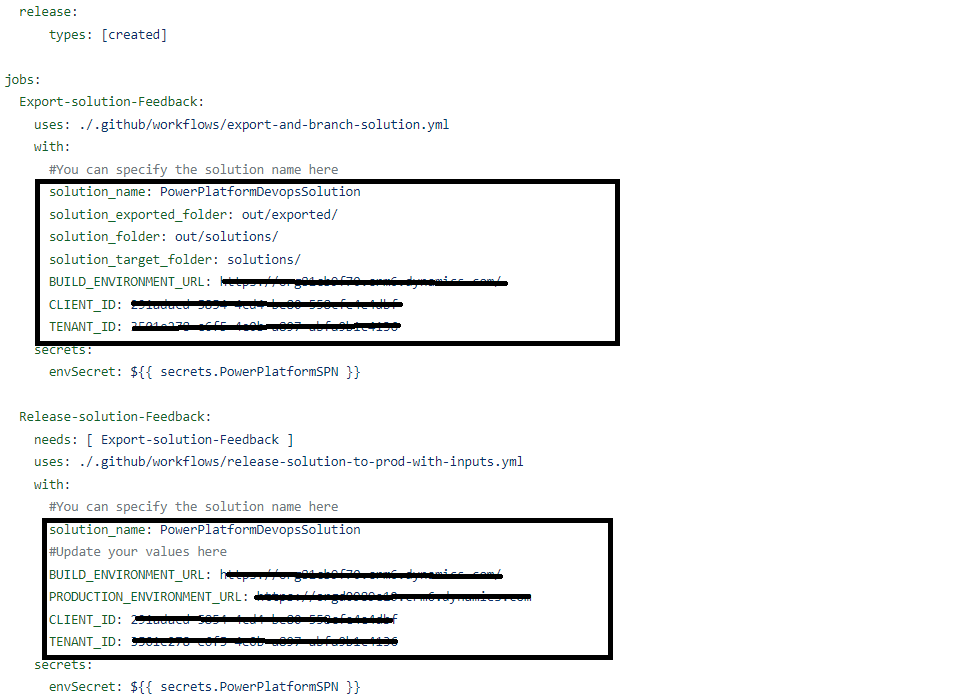
Now we will create the final flow using a similar approach and name it “release-action-call.yml and then copy the yml from here”. This flow will be triggered when a release is created and it will call the other two workflows to export the solution and then import it into the Test/Production environment. Update the parameter values with your environment URLs, solution name, and Azure App details.

You should now have three workflows.

Now go to releases and draft a new release and create a new tag for the release and a name for the release. Keep the “This is a pre-release” unchecked and publish the release.

This will trigger the “release-action-call” workflow which will then start off the other two flows.

Once the workflow has run successfully, you should be able to see the solution in the destination environment.